Even allocation of the breakup of incomes and expenses is available to different cost centres or profit centres. Tally Prime, the latest version of tally ERP provides a business with reports that help them view income and expense groups or other groups with the profit centre or cost centre allocations. This article will learn how to create centres and see cost reports in detail in Tally prime 2022. How to use BRS (Bank Reconciliation) in Tally Prime.
Create Cost Centre One by one
When a company has many income and expenses transactions, including staff welfare, projects, employees, payment recovery, conveyance, etc., they can maintain them as per business unit, employee, project, department, and so on by using the cost centre function in TallyPrime. This feature of tally prime enables them to allocate their incomes and expenses under centres or profit centres. To create centres one by one, follow the steps mentioned below:
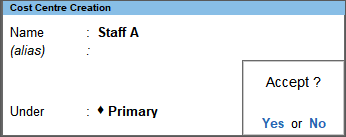
First, go to Gateway of Tally > click Create > choose Cost Centres > press Enter. Or, as always, you can press Alt+G > Then go to Create Master > click Cost Centres > and press Enter.In case this feature is inactive, you will have to activate the Centres feature. Select Yes or press Y to proceed.Name & alias: As you activate the feature, Provide a name to the centre. As in other matters, you can specify multiple aliases.Under: In the ‘under’ section, Select Primary or an existing cost centre.centre name might vary according to your preference. Press F12 (Configure) to change the options. Or you can always press Ctrl+I (More Details) to enter any of the values without activating the F12 options.Now Accept the Centre master. Or press Ctrl+A to save.Click f12 on the screen to see the possible Configurations.
To create a centre or profit centre, if there is a need to create another Master: press F10 (Other Masters) and switch to the desired master screen. After creating another Master, you can continue from the same place on the Centre screen.
Create multiple centres or profit centres in one go
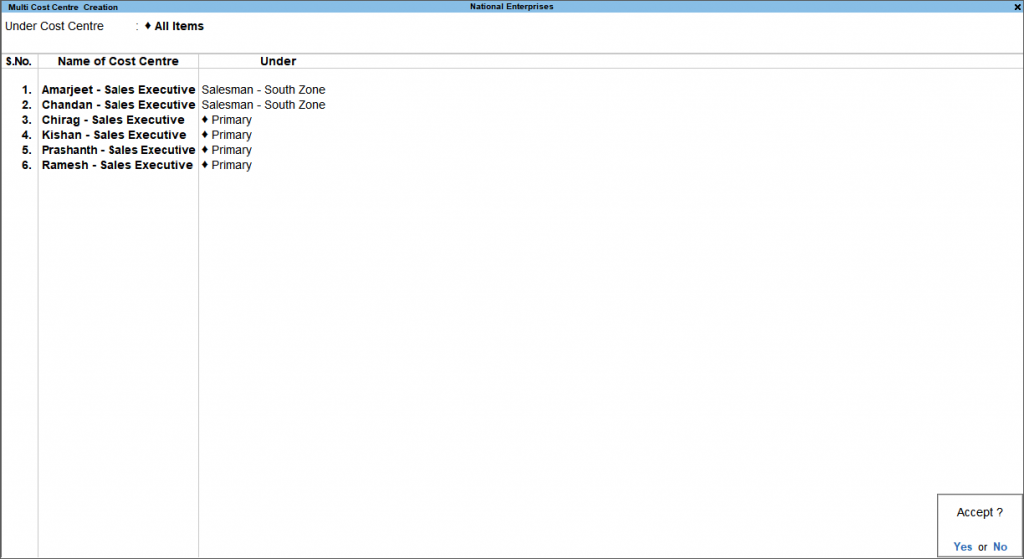
Go to Gateway of Tally > click Chart of Accounts >choose Cost Centres > and press Enter.Now Press Alt+H (Multi-Masters) > select Multi Create > and press Enter.If the feature is inactive in your tally app, you will have to activate the Centres feature. So Select Yes or press Y to proceed.Now you can follow the same procedure and Enter the Name of the Centre. Now select the centre under which it is being created. You can also choose a Primary centre.At last, Accept the master. Or, to save, you can press Ctrl+A.
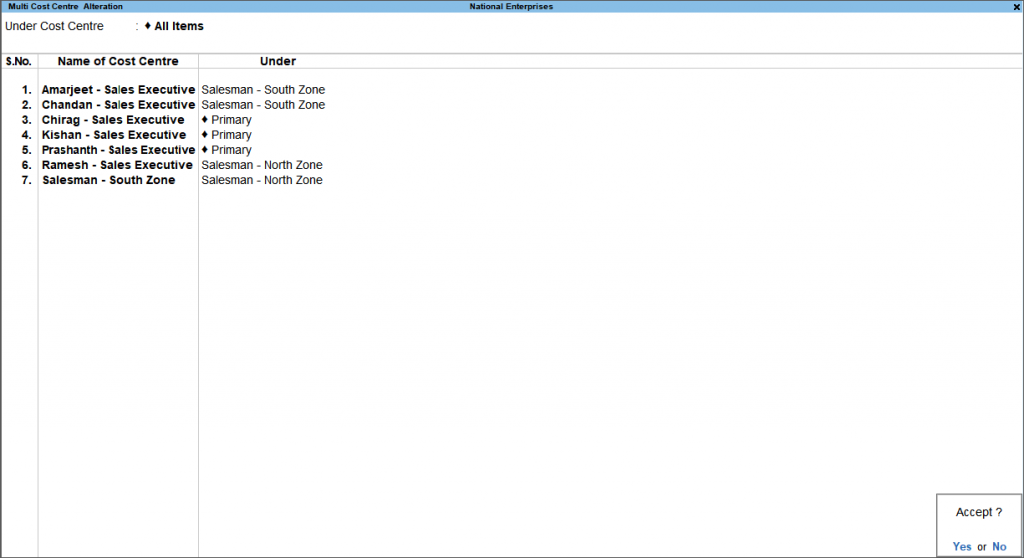
Go to Gateway of Tally > click Chart of Accounts > choose Cost Centres > press Enter.Now Press Alt+H (Multi-Masters) > select Multi Alter option > choose the cost centre or Primary > and press Enter.Update the details of the company as per your requirements.Accept the master. Or, to save, you can press Ctrl+A.
Cost Centre Report Summary
To see the centre summary, follow the steps given below:
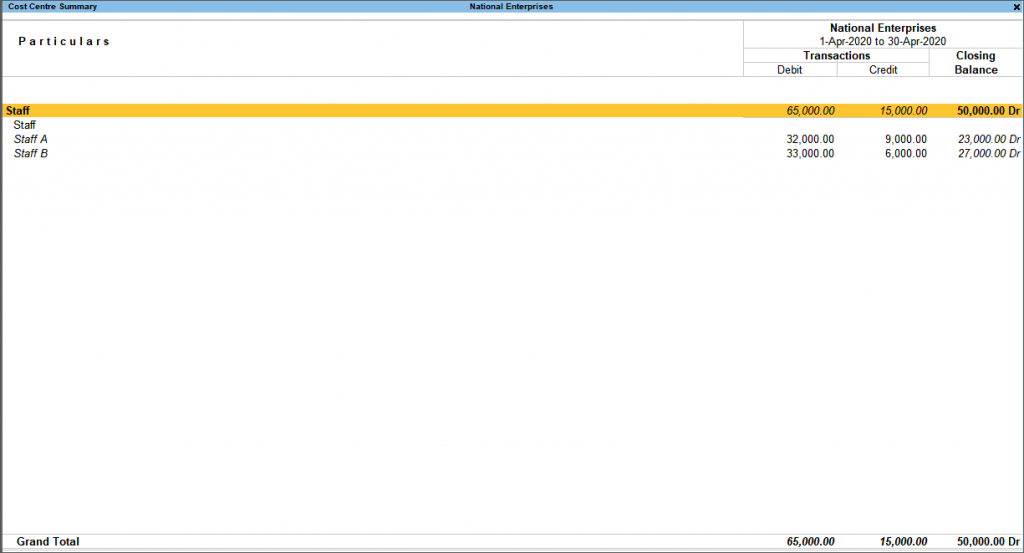
First, Press Alt+G (Go To) > then type or select Cost Centre Summary. To preview monthly summary, click on Monthly Summary.Or you can go to Gateway of Tally > Display More Reports > Statements of Accounts > Cost Centres > Summary.
The report will display the summary of incomes and expenses allocated to different centres or profit centres.
To have a detailed view of the report, Press Alt+ F5.While to see more, Press F12 (Configure) to change the options and F11 (Features) to enable or disable features.
Tally Prime considers all centres under an internal category called Primary Cost Category even if you have been using the feature without creating any cost category. Recommended Articles
How to create Group in TallyCA Final ResultCA Intermediate ResultCA Foundation ResultAlter Ledgers in TallyOpening Balance in Tally